About UVs

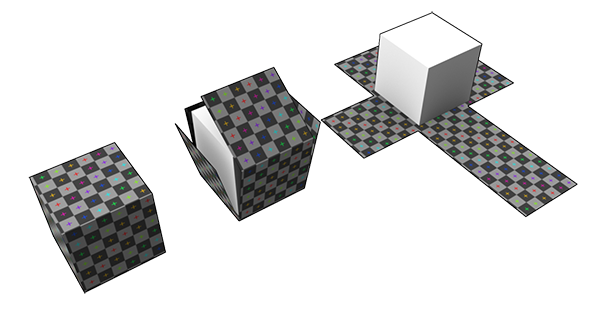
To bring realism and quality to a 3D model in a Real-Time 3D experience or to create CGI content, textures are often used in the materials applied to the 3D model. To define how these 2D textures are wrapped around the 3D model’s meshes, coordinates textures, also called UVs, are required. UV Mapping is the action of creating UVs for 3D meshes.
Here is an example of a CAD model transformed into a mesh with UVs to correctly display textured materials:

UVs are required for:
- Repeatable textures (also called seamless or tileable textures): they are images made of repeatable patterns, used to mimic how materials such as of wood, carbon, fabric, brushed aluminum... behave in the real world. They generally use the first UV channel stored in a mesh (UV channel 0)
- Lightmaps, used to store lighting/shadows, Ambient Occlusion, Global Illumination... They generally use the second UV channel stored in a mesh (UV channel 1).
Both participate in bringing quality and realism to a 3D model in a virtual scene.
UV editing (or UV Mapping) is one of the most tedious and complex task when creating 3D models for virtual experiences, and users strive for automatic solutions, as much as possible. Manual UV unwrapping will always be necessary for advanced control over UV creation, and an area reserved for experts (and DCC tools).
TIP Lots of great tips and information about UVs are available in this documentation page of Khronos Group's Real-time Asset Creation Guidelines
UVs and CAD models
CAD models come from CAD software where texturing and UVing is generally not required, because realism is not a key aspect.
But for customers willing to leverage their CAD data to create realistic content for Real-Time 3D experiences, a correct texturing becomes a necessity, and an issue!
In Pixyz, there are several ways to create UVs:
- Using the UV Projection Tool (available in Pixyz Studio only): it's an interactive tool allowing too create UVs using the projection of primitives (not automatic)
- Using the Automatic UV Mapping function: it's an automatic unwrapping solution, which can give good results with CAD models, but not in all situations
- Using the Basic UV projection
- Creating Continuous UVs from CAD Models
Please not that very high standards of quality can only be reached with manual UV unwrapping, with tools available in DCC software like Autodesk 3DSMax and Maya, Blender...
Additionally, manually unwrapping tessellated CAD models can be struggling, as they are generally more dense (higher polycount) compared to 3D objects created with polygonal modeling.
Basic Projected UVs
When it comes to dress CAD/3D models with textured materials and lightmaps, basic UV projection is used most of the time, because it’s fast, can be automated and does not require much expertise:
- For repeatable textures, basic projection gives acceptable results when perfectly aligned repeatable textures are not required, but does give limited result when advanced quality is required.
On the image below, you can see that where UVs obtained by projection (along each direction of the object's Bounding Box) meet and result in texture discontinuity:
- For lightmaps, UVs can also be obtained by basic projection plus a UV repack, which gives acceptable results, but potentially unoptimized for baking (small and stretched islands)
Generate continuous UVs from CAD models
Pixyz offers a way to create good UVs for CAD models, usable for repeatable textures, which is better than basic UV projection: see Continuous UVs from CAD Models